SSH Key Setup
An SSH key is a secure access credential used in the SSH protocol and establishes a secure and encrypted connection to Engaging. This page is for those who wish to implement SSH key authentication on top of general MIT Kerberos authentication.
SSH keys consist of a pair: a public key and a private key.
- Public Key: This key can be shared freely and is used to encrypt data that only the corresponding private key can decrypt.
- Private Key: This key must be kept secure and private. It is used to decrypt data encrypted with the corresponding public key and to prove the identity of the user during the SSH authentication process.
When you attempt to connect to an HPC system using SSH key authentication, the system uses your public key to initiate a challenge that can only be answered correctly using your private key. If the correct response is received, the system verifies your identity and grants access.
Using the key and lock analogy, the private key is like your key, and the public key is like a lock you might place on a gym locker, which would be like your account on Engaging. You can leave the lock locked on the locker at the gym, because no one can open the lock without the key, but you wouldn't want to share your key with anyone else, because then they could get into your locker.
Do Not Share Your Private Key
Your private key should never be shared with anyone. If someone else obtains your private key, they could potentially gain unauthorized access to any system your key is associated with.
Checking for Existing SSH Keys
Before you generate an SSH key, you should check for existing SSH keys.
- Open your local terminal.
- Run the following command to view all existing SSH keys:
- If you see a list of files, you have existing SSH keys. If you receive an error that ~/.ssh doesn't exist, you do not have an existing SSH key pair in the default location. You can create a new SSH key pair in the next step.
Generating SSH Keys
If you do not have an existing SSH key, follow these steps.
- Open your local Terminal.
- Run the following command to generate an RSA key:
-
Save the key pair: You will be prompted to enter a file path to save the key. Press
Enterto accept the default location: -
Passphrase: You will be asked to enter a passphrase for additional security. You can either enter a passphrase or leave it empty and press
Enter:
Note
Engaging, we recommend setting a passphrase as it provides extra security for your account by helping to prevent someone else from using your SSH keys. When you create a passphrase, your private key can only authenticate into your account when the correct passphrase is provided during login. Since you set your passphrase on your system, ORCD staff cannot help you remember or reset the passphrase for your SSH keys. You must create new SSH keys if you cannot remember your passphrase.
Uploading SSH Key on Engaging
To upload your SSH key on Engaging, you must update the authorized_keys file on Engaging via terminal. Alternatively, you have the option to use OnDemand.
To add your SSH key via Terminal, please follow the steps outlined below:
- Login to an HPC system login-node using MIT Kerberos Login.
- On your local machine, copy the contents of your public key (
~/.ssh/id_rsa.pub):Make sure to copy the entire line starting with ssh-rsa and ending with your email address or comment.
- On the head-node, append the copied contents to the authorized_keys file located at
/home/[username]/.ssh/authorized_keys. You can use any text editor of your choice, such as nano and vim. For example, if you're usingnano, the command would be:
Note
Do not remove anything already present in the authorized_keys file. Be careful to append your key to the end of the file rather than replacing its contents.
To add your SSH key to Engaging via OnDemand, please follow the steps outlined below:
- Login to Engaging OnDemand through the portal.
- Once logged in, navigate to
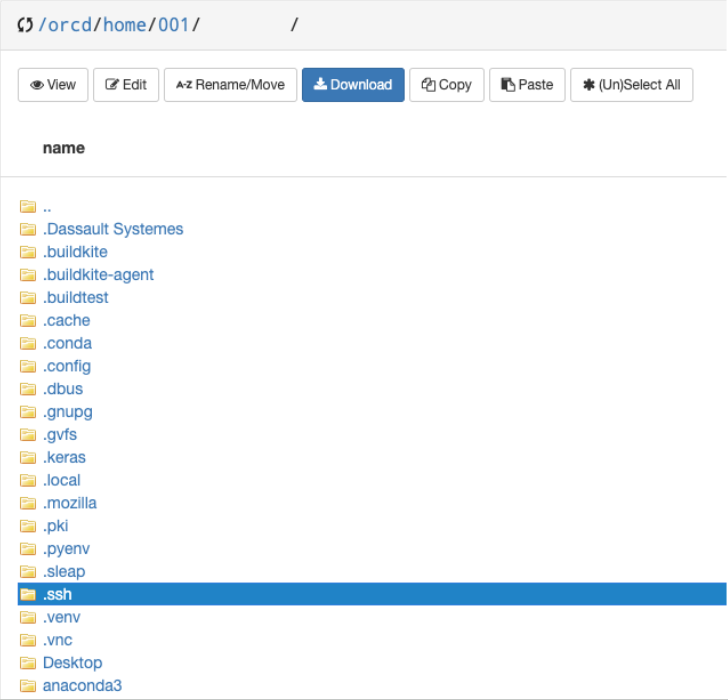
FilesandHome Directory. - On the top right corner, check
Show Dotfiles.
- Click on the
.sshfolder.
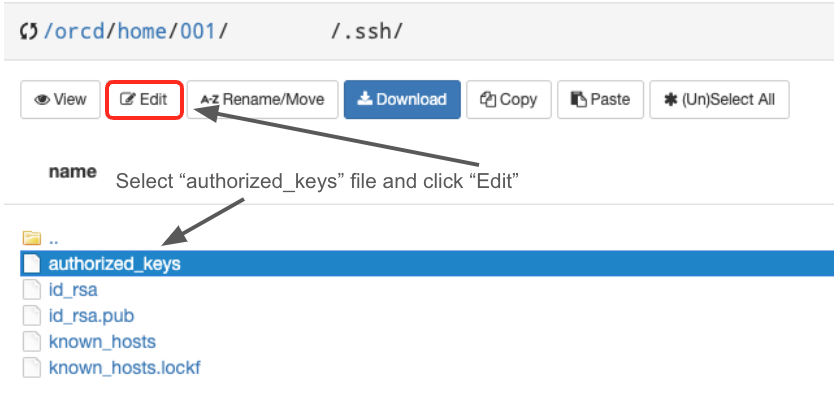
- Locate and edit the
authorized_keysfile to add your new key.
Note
Do not remove anything already present in the authorized_keys file. Be careful to append your key to the end of the file rather than replacing its contents.
Testing your SSH Key Setup
To ensure that your SSH key is correctly configured, follow these steps:
- Attempt to login on your terminal:
ssh your_username@cluster_address. For more details, you can reference the Getting Started Tutorial page. - If prompted for a password, the SSH key setup did not work. Recheck the steps and correct any issues.